Custom 12v Powerboard & House Battery System: Planning, Diagrams, and Parts
The Inspiration

GPFactor Powerboard - Source @gpf_actor on Instagram
GPFactor’s Powerboard product is quite delightful, and I have been lucky enough to see them in person on a couple of the guys’ trucks. I liked that it had a rather industrial look and feel and featured a lot of the Blue Sea products. I loved that the Blue Sea Deck Panel had interchange-able, resettable breakers, so I wouldn’t have to ever deal with fuses. I started this project prior to the Powerboard hitting the market, and it’s now available through OK4WD.
Why didn’t I wait for the product release to purchase? There are two main reasons 1) I’m impatient and 2) I wanted to preserve the capability to tinker and modify the different components of my electrical system. The Powerboard, while high quality and plug-and-play, is built from laser-cut metal and I don’t yet have the tooling to modify it with the respect it deserves. There’s no way I’m taking a cutting wheel to that.
I knew very little about wiring and electronics. I had taken electricity & magnetism in high school and college, but this was my first foray into tinkering with electronics. Needless to say, I was intimidated by what I would have to learn.
The Research: Creating the Wiring Diagram
I ordered all of the components prior to actually starting the build, without knowing exactly how all the pieces would fit together. Thus began the long process of planning it all out. Wiring diagrams offer 1) a common language between products to understand how the wires need to be routed and 2) a simple, low risk way of prototyping. It makes it easy to visualize where and how the different components would be connected.
Getting this right was vital. Not only so that I would have a functional electrical system in the Canopy Camper, but also so that I didn’t catch my truck on fire. It was important that the wires were sized correctly, the connections were solid & protected, and everything was fused properly. I also watched a few videos online (as we all do) explaining the process. Greg Virgoe’s channel is excellent (check out his plumbing videos, too), and I also watched a lot of Explorist Life - DIY van builds.
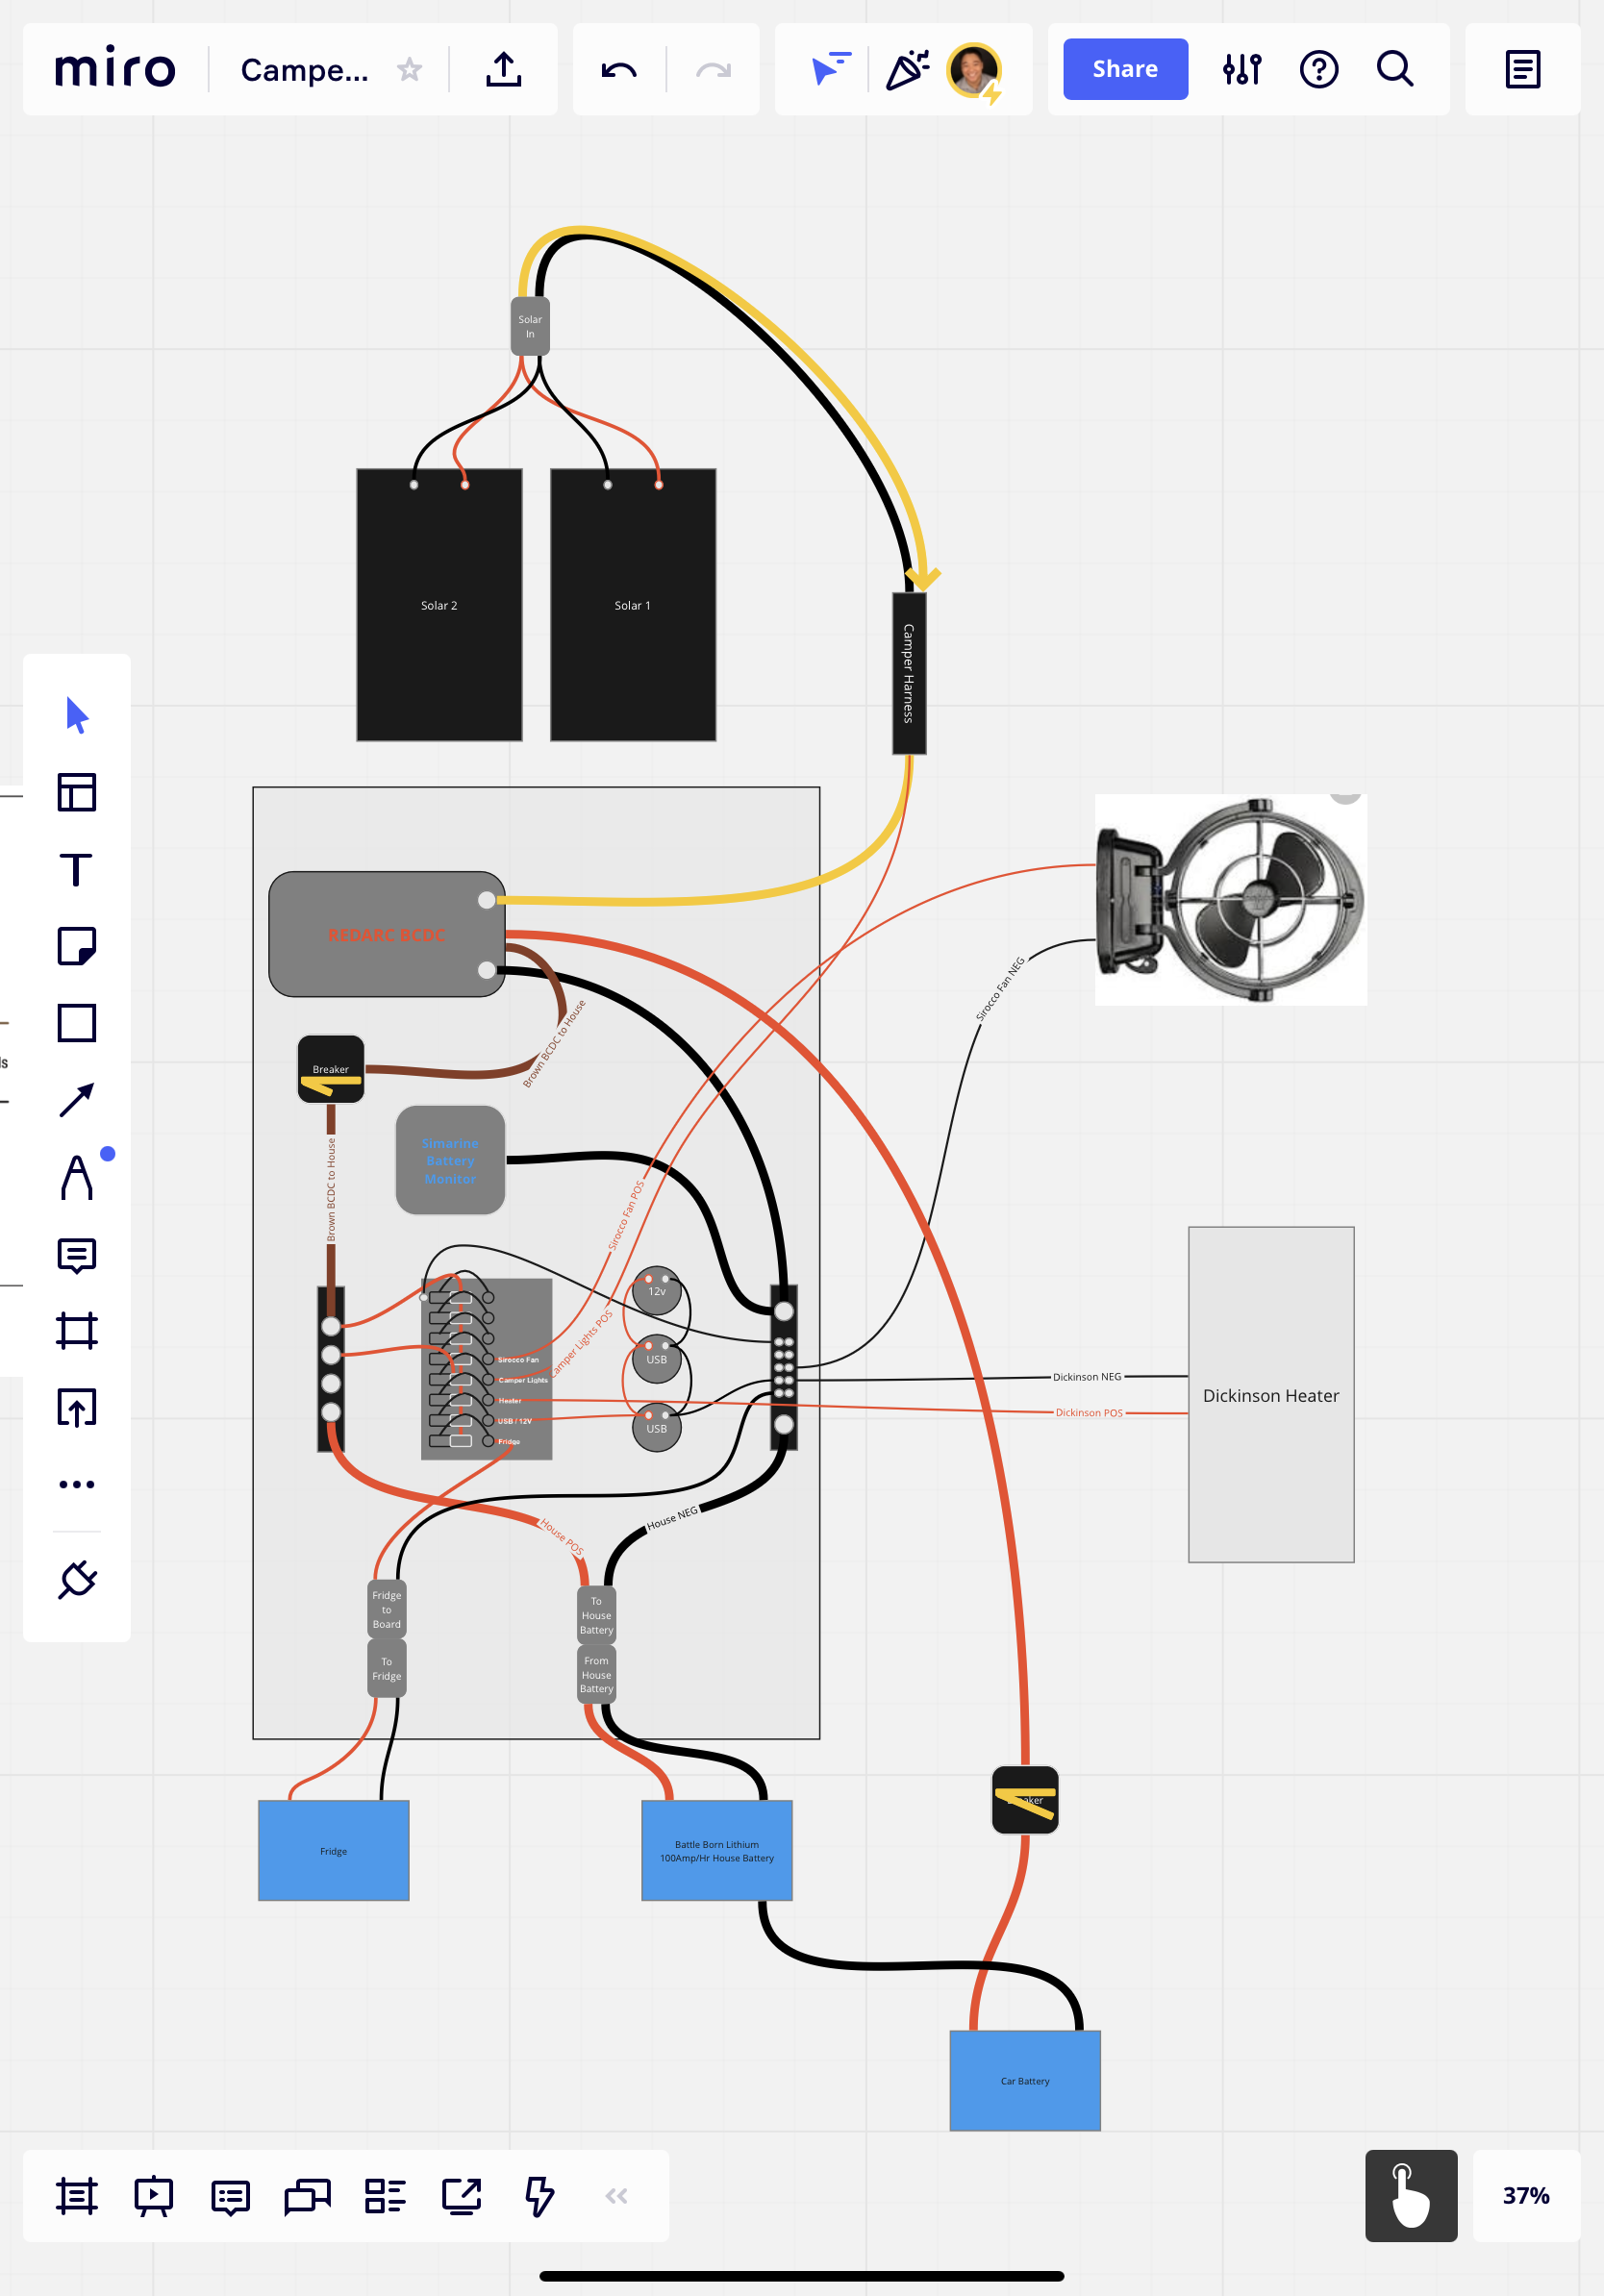
V1.0 of the electrical panel (DO NOT USE - ERRORS)
To create the actual wiring diagram, I used one of my favorite products called Miro. It’s a virtual whiteboard that I’ve used extensively in my everyday job as a Product Manager. It’s one of the first three software products I’d pick up in a new role. It’s easier to use and less frustrating that drawing something out on paper (I could easily fix mistakes) and faster than using Google Slides or PowerPoint.
I started with the manuals from the different product components that would make up the system. It’s quite nice that even though they provide paper manuals with their products, all of the manuals and wiring diagrams are easy to find online. See the Tips, Tricks, and Research section below for links to the Alucab wiring as well.
The Process
Where do you even start? When there are this many components in a complex system, it’s hard to choose. But, like with anything, I started with what I knew.
I placed the major components on the Miro board and began connecting them with lines. This process took…many…iterations, checking and rechecking my work. You can see some of these below.
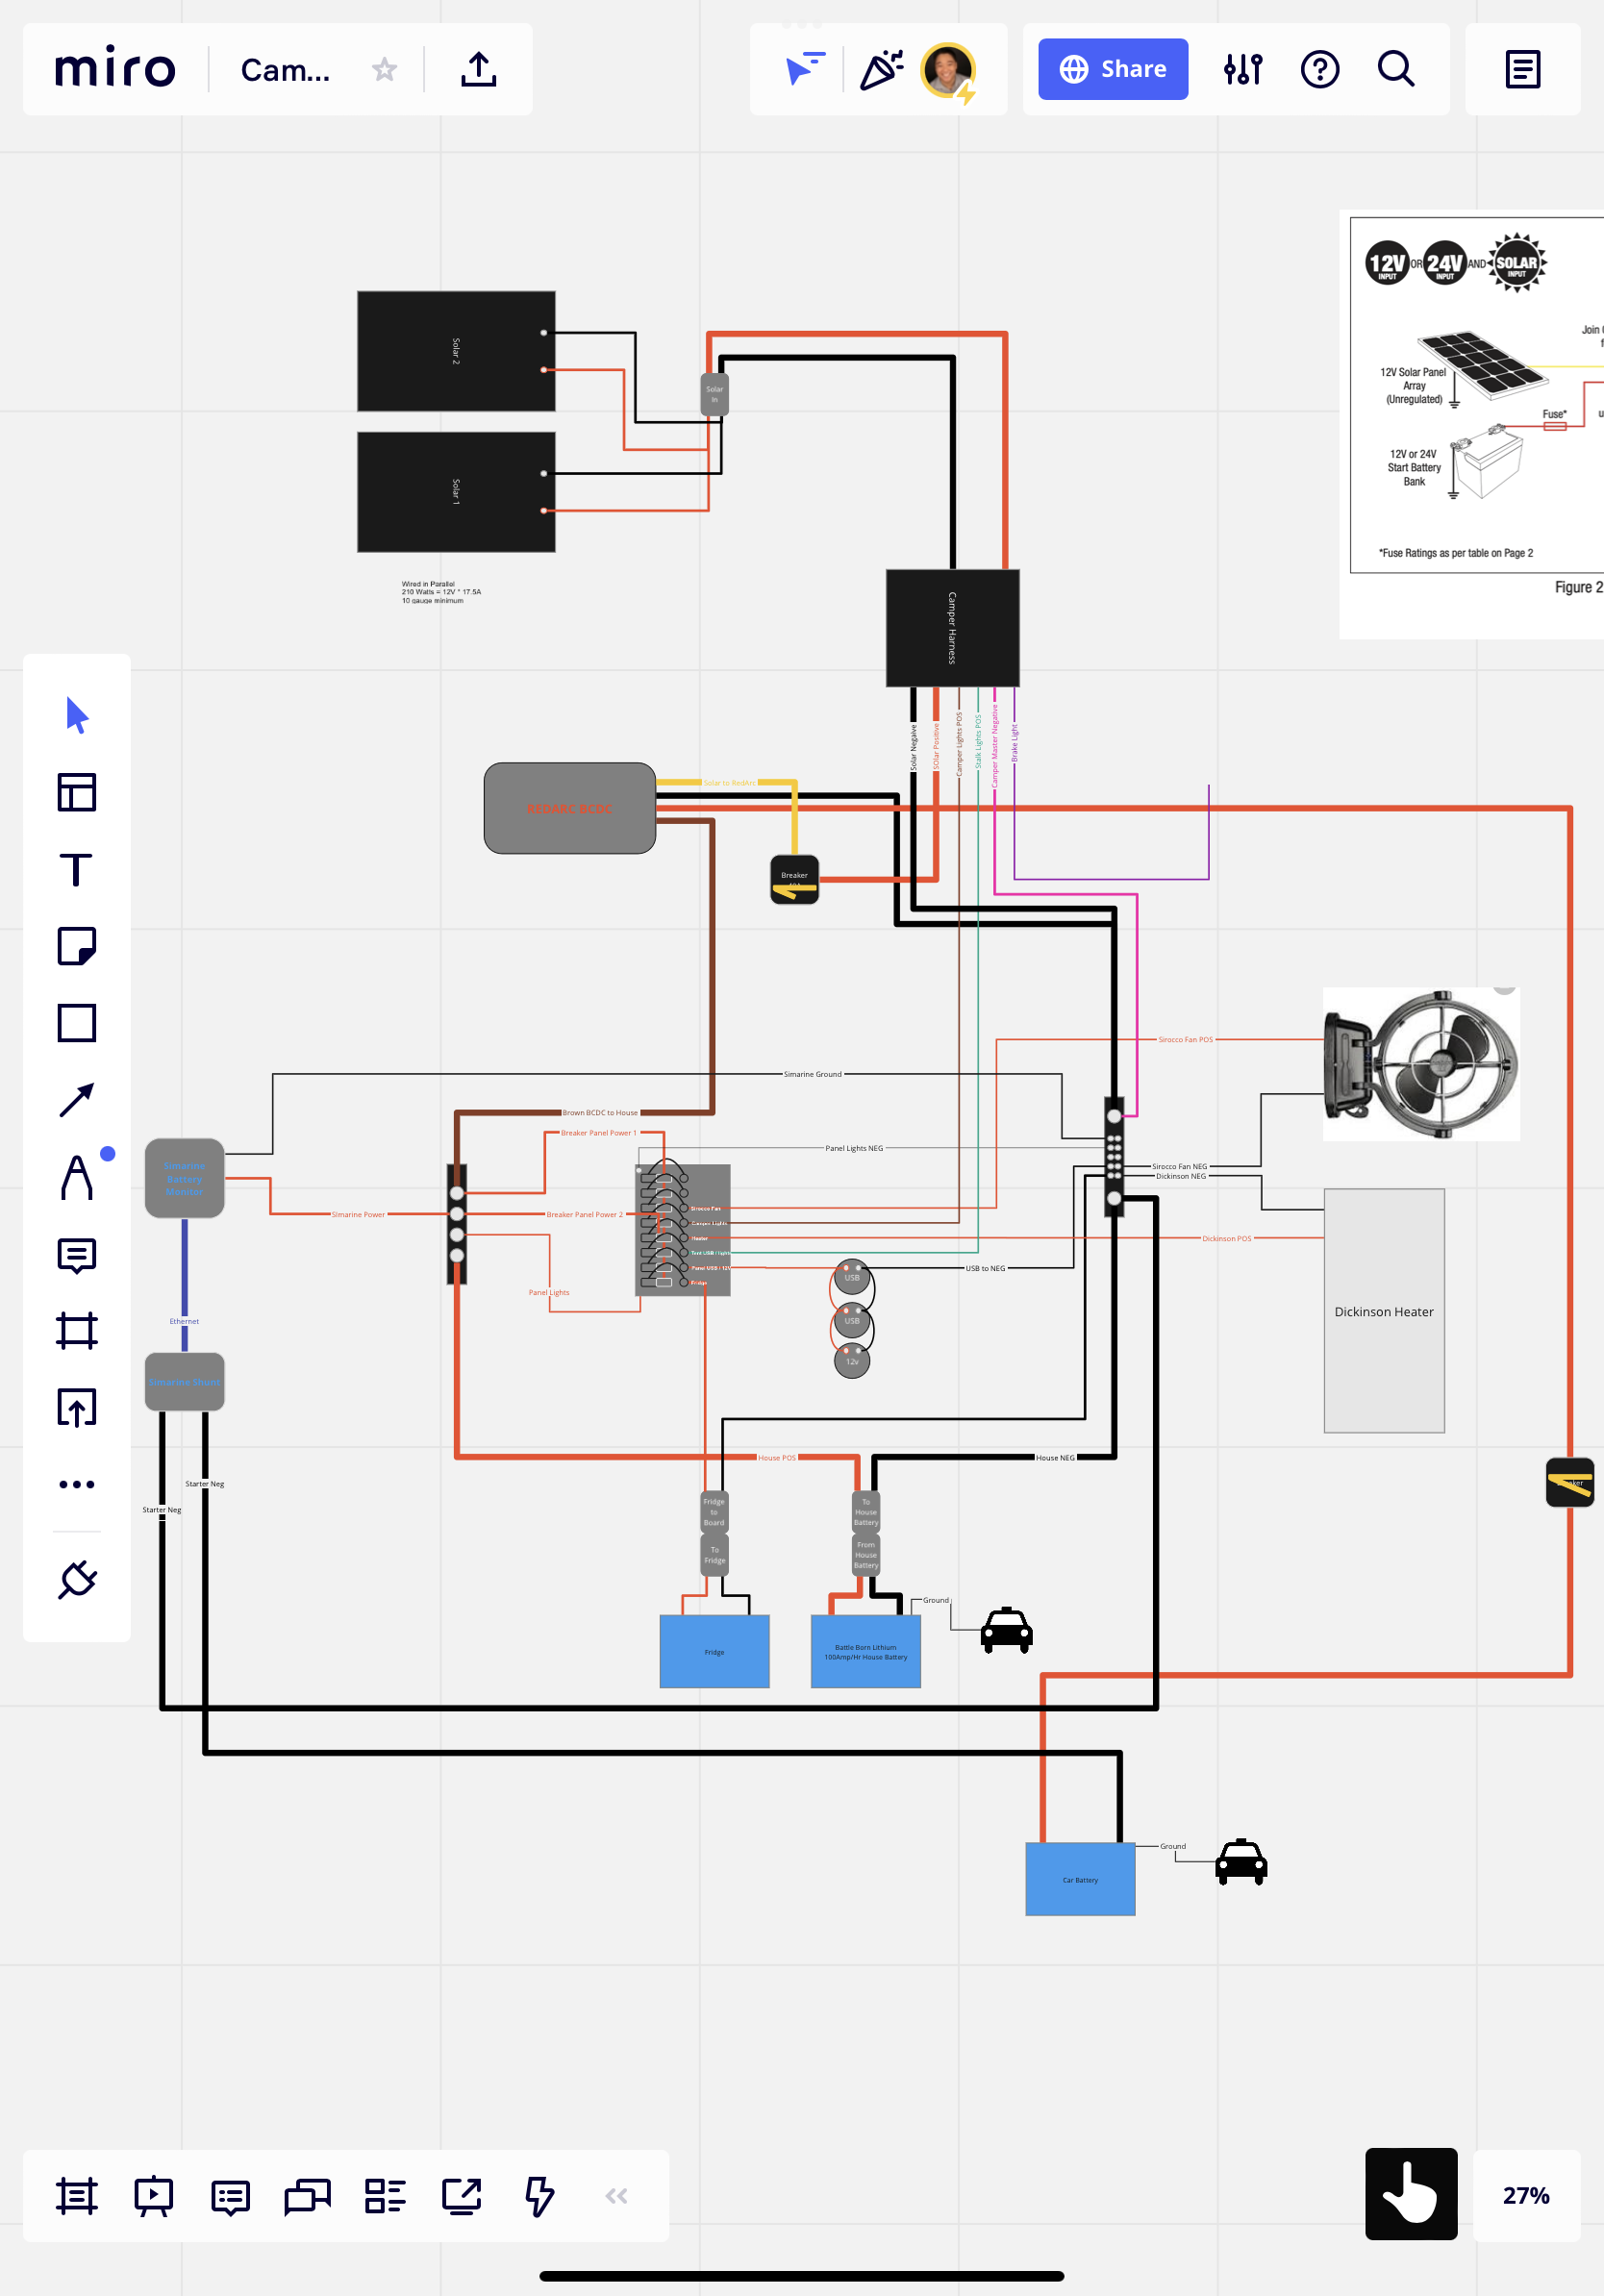
Close to final (DO NOT USE - there are mistakes)
The Build

Starting the Board
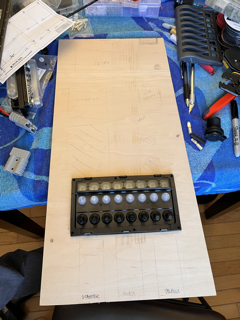
I took measurements of the spot where the panel would be in the rear, driver-side cubby of the canopy camper and cut three boards of 3/8 thick, high density birch plywood.
I used one of the panels as the prototype. This one would not get painted, but it would get used to lay everything out and ensure I had enough clearance between the components and the wiring.
There were two primary differences between my board and the GP Powerboard: 1) I added an additional Blue Sea USB charger for a total of 4 ports and 2) I installed my Blue Sea Deck Panel in a horizontal orientation.


The Accessories It Powers
I have two more switches that are currently going unused. Some options: water pump, water heating pads, 360-degree external lights (for when the windoors are closed and the heater is on). If you have suggestions for other accessories, let me know below!
Switch 1: Dometic CFX3 75L Dual Zone Refrigerator
Switch 2: Dickinson Heater Fan
Switch 3: Sirocco II Fan
Switch 4: Viair Air Compressor 400P (required replacing the 15A breaker in the panel with a 40A one)
Switch 5: Empty
Switch 6: External Area Lighting - 3x Rigid Scene Lights
Switch 7: USB Chargers - both the panel chargers and the built-in chargers in the bed area
Switch 8: Cabin Lights - goes to the Alucab harness for both the National Luna lights and the Stalk Lights in the bed area.
The first install. Everything is working!
Everything installed and powered up.
Installing the Fridge [Coming Soon]
Coming Soon
Troubleshooting
So, with as much planning and prototyping I did, the panel still isn’t at 100%. All of the components are working properly, but my battery isn’t charging, which is telling me that the connection between the RedArc and the House Battery is not perfect.
What Would I Do Differently
I’m going to keep everything in the same ecosystem and give the Redarc total vehicle management system.
Tips, Tricks, and Resources
The Blue Sea Panel comes pre-wired
Parts List:
Panel
1/2-inch Birch or Maple Plywood
Self-etching primer
Bedliner Spray Paint
M6 Rivnuts (McMaster)
M6 20mm button head bolts (McMaster)
M8 Jam Nuts (McMaster)
1/8-in aluminum angle (for brackets) (McMaster)
Systems Components
Battle Born 100Ah LiFePo4 (Lithium) battery
Blue Sea 25A Breaker (Series 187 Panel Mount)
Blue Sea 100A Breaker (Surface Mount)
Blue Sea 8-switch Deck Panel with Breaker (4378)
Blue Sea USB x2
Blue Sea 12V
Blue Sea Mini Bus Bar (P/N 2315)
Blue Sea Common Bus Bar (P/N 2300)
Simarine PICO One + Shunt
Redarc Dual Input BCDC1240 Charger
Victron Energy Plug-In Trickle Charger
Electrical Components
14 gauge wire, black and red
10 gauge wire, black and red
6 gauge wire, black and red
90-degree Female Spade Connectors
Other Spade Connectors
Terminal Kit with Heat Shrink
Tools
Step Bit
Grommets
Crimping Tool
Jigsaw
2 1/8 inch Hole Saw (for breaker)
1-inch hole saw (for USB & 12V)